CHAPTER 1:
Getting Started You must have two things to begin executing Ada Analyzer commands:
- Visibility: The Ada Analyzer command executables located in $AA_HOME must be on your path. Consult with your system manager or the person who installed the Ada Analyzer for the full pathname of $AA_HOME. Path variables typically are updated during installation, but they may need to be established for each Ada Analyzer user.
- Analysis switches: To facilitate use of the Ada Analyzer, a set of file-based switches has been defined to control execution. Although all Ada Analyzer commands have simple parameters that you can input directly at the dialog box, many commands reference the analysis switches for more global settings. The modification and use of analysis switches is described in "Analysis Switches".
These items are the minimum requirements to execute Ada Analyzer commands. The remainder of this chapter provides the information necessary to use all features of the Ada Analyzer effectively.
This chapter begins with a short introduction on installation. The next section, "Command Execution", describes the invocation of commands and the expected parameter-option inputs. It describes both standard and nonstandard parameter options and errors that may be reported in command logs.
The section titled "Hypertable Report Output" describes what a hypertable is, how it is used to contain the output of the Ada Analyzer commands, and how you can manipulate the output to get more information.
The section "Online Documentation" describes how to access the online documentation for the Ada Analyzer.
The section"Configuring the Ada Analyzer" explains the configuration options (analysis switches) available within the Ada Analyzer and how to change them to optimize the contents of the output and its format.
InstallationInstallation of the Ada Analyzer is a straightforward process that is similar to the installation of layered products offered by Rational. The following steps are required to install the Ada Analyzer:
- 1. Read the release tape or CD.
- 2. Execute the installation procedures.
- 3. Register the Ada Analyzer with the authorization code provided for the machine on which the installation was performed.
These steps are described in detail in a separate section of the Apex installation Guide.
Command ExecutionAda Analyzer commands can be executed either by entering them at the shell command line or through the graphical user interface (GUI) using menus and dialog boxes. Menus offer a convenient way of indicating which command to execute, and dialog boxes offer a convenient method of collecting parameter options for Ada Analyzer commands. When a dialog box is completed, it makes a call to the command-line interface with the options and parameters selected by the user.
Ada Analyzer commands have the following command-line syntax:
The Ada Analyzer main program, named aa, is called to invoke the command-line parser. The name of the Ada Analyzer command must be the first argument, followed by parameter options in any order. All options have a name and are indicated with the hyphen (-) prefix character. The list of units to process appears after all named options have been specified. Multiple unit pathnames should be separated by spaces.
The precise set of options supported by each command is described in Chapter 3. The Sort_By_Subsystem, Use_Configuration, and To_Report_Named options are considered standard parameter options because they appear in almost every Ada Analyzer command. A description of these options is provided in this section and is not repeated in every command description. A general description of Boolean, threshold, and string options is also provided.
Parameter Options
- Boolean options: The presence of named Boolean options in the command line specifies that the corresponding command parameter should be set to True. All Boolean parameters to Ada Analyzer commands have the default value of False. Several commands have Boolean options of the form Include_*. The * wildcard often names a specific kind of Ada construct that the command could search for. Including these parameter options means that these constructs will be included in the report output of the command. Omission of the option means that they will be excluded.
- Threshold options: Threshold options correspond to integer-valued parameters. The named option must be followed by an integer-valued argument. This value indicates the maximum or minimum value allowed for an attribute of the Ada constructs being analyzed. If a maximum threshold is not exceeded, that construct is included in the report output. For example, the Locate_Inline_Candidates command counts the number of statements in the body of all subprograms, the number of local declarations, and the number of call sites. Each of these subprogram attributes has a maximum threshold that would not make it an inline candidate. Too many statements, local declarations, and, in some cases, callers would result in too much code expansion if the subprogram were inlined. Thus you can select appropriate thresholds for Ada Analyzer commands to collect only items of highest interest in the hypertable output.
Some threshold parameters are expressed as minimums, requiring the program construct to have at least the threshold number for a particular attribute. In this case, constructs are included in the hypertable only if they meet the minimum threshold values. In some cases where multiple minimum-value threshold parameters are present, an additional Boolean parameter option is available to specify whether all thresholds must be met (the and relationship) to be included in the report output, or if meeting at least one threshold (the or relationship) qualifies. The default is to or threshold values. The Boolean option
And_Threshold_Values can be included to select the and relationship.All threshold parameter options have defaults that will be used if the option is omitted. Consult the command descriptions in Chapter 3 or the "Command-Line Summary" on page 283 for specific default values.
- String options: Some Ada Analyzer commands have string-parameter input. These named options must be followed by a string of text with no spaces, or enclosed in quotes if intervening spaces are required.
- Switch options: Any switch value (for a list of switches see "Analysis Switches") can be overridden with a command-line option of the form "-switch_name value". This will set the analysis switch to the specified value, overriding the value specified in the analysis_switch_file. This capability is available only through the command-line interface. Ada Analyzer commands invoked via the GUI will use switch values specified in the analysis_switch_file in the current configuration policy and cannot be overridden.
- Help option: A help option (-h or -help) can be used either with the aa command to get a list of all commands or with individual commands to get a list of valid options for that command.
- Sort_By_Subsystem option: This is a standard Boolean option. When included, it specifies that hypertable entries should be sorted by subsystem name first, then unit name, and then left to right by element attributes after that. This option is most useful when the output must be distributed to subsystem or unit owners for their inspection and/or repair. The default is to sort left to right by column entries.
- Use_Configuration option: This standard option requires that a pathname of a configuration file follow as its argument. When included, this option specifies that the configuration file define where to find references to declarations in other, external views. The default is to use the views that are imported into the referencing view.
- To_Report_Named option: This standard option requires a pathname (no embedded spaces allowed) as its argument. It specifies where to place the analysis output of this command. The suffix .aarpt will be appended to this name to indicate that it is an Ada Analyzer report file. If a simple name is given as the argument to this option, then a file with that name will be created in the default output directory specified by the analysis switches. See the section titled "Analysis Switches" for more information. If the pathname argument begins with a slash (/), dot (.), or double dot (..), the output file will be created according to the standard UNIX® resolution rules.
- <list of units>: This list must appear after all named options. Items in the list specify which units to analyze. Each item in the list must be separated by spaces. Pathnames of configuration files, views, directories, or specific Ada units may be included. If a configuration file is specified, all units in all views listed in the configuration file will be included in the analysis. If a view or directory is specified, all Ada units contained within that view or directory will be included in the analysis. Only installed Ada units within the expanded list will actually be processed, however, with warning messages generated for objects of other classes or Ada units that are not installed or coded. A switch is available to compute the compilation closure (that is, all withed units) of the Ada units specified by this option. This can be useful for checking only those units in the closure of a specific main program. See "Configuring the Ada Analyzer" for information on how to set all switch values.
Although the Ada Analyzer is most effective when used interactively through the GUI, it is also useful to create batch-oriented scripts that can be scheduled to collect analysis information at regular intervals. See the section titled "Creating Command-Line Scripts" on page 265 for more information.
Command Execution through the GUI
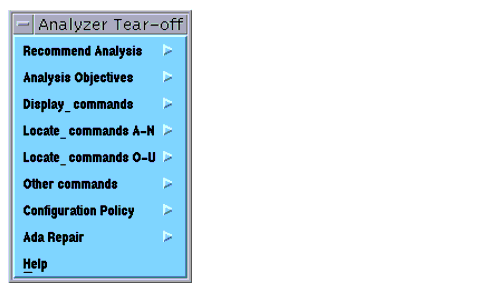
Most users will find that invocation of Ada Analyzer commands through menus and dialog boxes is more convenient than the command-line form. A set of cascading menus is available to invoke each Ada Analyzer command. The top-level menu is named Analyzer and appears as follows when "Torn off" for continued access. Menus can be pulled down as well.
Each item in this menu has a second-level menu that can be selected by moving the cursor over the triangle on the right side of the top-level menu. Each third-level menu contains a list of Ada Analyzer commands. For example:
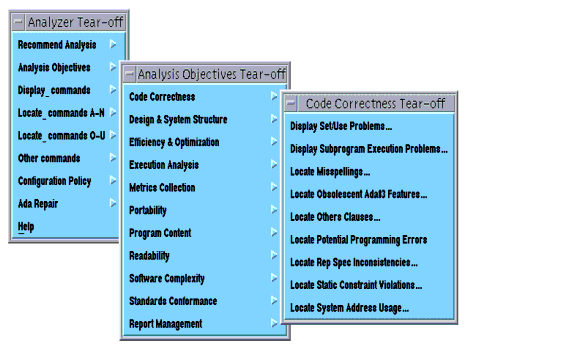
The ellipsis (...) indicates that a dialog box will be displayed for collection of command options if that menu item is selected.
The "Recommended Analysis" provides sub-menus offering a recommended list of Ada Analyzer commands to developers, designers, code reviewers, managers, and quality assurance personnel that support their software development activities. In addition, commands are also suggested for the analysis of legacy code and automate generation of supporting documentation.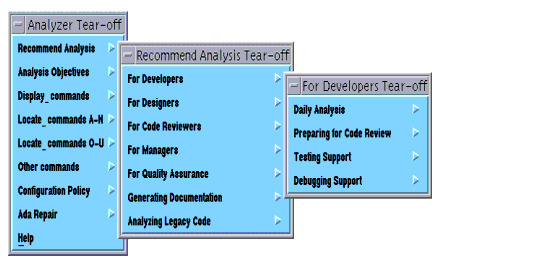 In order to make commands easier to find by users familiar with the Ada Analyzer, four command locator menus are available in the main Analyzer menu. The sub-menu "Display_ commands" contains all commands whose name begins with "Display_". The sub-menu "Locate_ commands A-N" contains all commands whose name begins with "Locate_A" through commands that begin with "Locate_N". The sub-menu "Locate_ commands O-U" contains all commands whose name begins with "Locate_O" through commands that begin with "Locate_U". The sub-menu "Other commands" contains all commands that do not begin with "Display_" or "Locate_".
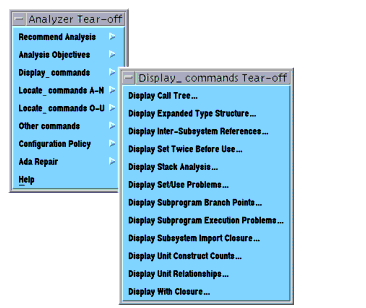
All Ada Analyzer commands use the same dialog-box format to collect command options. Two commands, Check_Consistency and Create_New, under the Configuration Policy menu item have their own dialog boxes and are described later in this chapter. See "Configuring the Ada Analyzer" for more information on these commands.
Some commands that apply only to Ada units or specific declarations within Ada units only appear in menus in Ada unit windows. They do not appear in directory object windows since their analysis cannot be apply to entire Ada units or sets of Ada units.
All Ada Analyzer commands use the following dialog-box format. The example below contains all possible fields in the dialog box. Many commands will not have all these fields in their dialog box. For example, many commands do not have any thresholds, and most will have only one locator for the units to analyze.
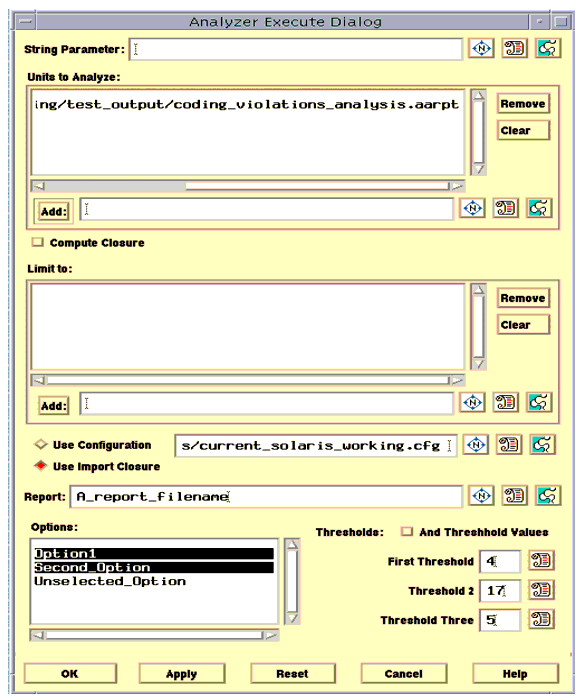
The preceding dialog box is divided into seven sections where the user can enter or select command options.
- String_Parameter: This section appears at the top of the dialog box and is used to collect string parameters. This parameter can be simple text or a pathname to an Ada unit or declaration. This section is omitted when the command does not take a string parameter.
- Units to Analyze: This is a standard Apex file locator and is used to specify which Ada units should be analyzed by a command. Objects selected within the window where the command menu item was invoked will appear as initial values in the right side of the locator. Configuration files, views, directories, and Ada objects can be added or removed from the unit list as required to specify the desired list of Ada units to analyze.
- Compute Closure: If checked, the compilation link closure of the Units to Analyze will be computed and the analysis will be performed on that set of units. This computation intensive option should be used with care. See also the corresponding analysis switch definition on page 27. Note: This option only applies to commands where sets of units are analyzed and not to commands where a single unit or declaration input is expected.
- Execute in Background: If checked, the execution of the command will be performed as a UNIX background process. The default is to execute the command in foreground. (Note: This is not shown in the dialog box example above.)
- Limit To: This is a standard Apex file locator and is used to specify a set of Ada units that limits the extent of analysis. It is often used to specify where recursion of closure operations should cease. The few commands that use this field label the locator with text that indicates exactly what the limiting units should be. Configuration files, views, directories, and Ada objects can be added or removed from the unit list as required to specify the desired list of limiting Ada units.
- Configuration: This section is used to specify whether import closure or a named configuration file should be used during analysis to resolve references. The default is to use the import closure of the units selected in the Units to Analyze locator. If the user desires another configuration, the Use Configuration radio button can be selected. The default configuration is the pathname of the configuration file from the analysis switches in the user's configuration policy. See "Analysis Switches" for more information. This pathname can be changed to another configuration file if desired.
- Report: This section defines the name of the output file to create for the analysis report. A simple name is provided as the default argument for this option. This name can be changed to any valid pathname if desired. When a simple name is specified, a file with that name will be created in the default output directory specified by the analysis switches. See "Analysis Switches" for more information. The suffix .aarpt will always be appended to this name to indicate that it is an Ada Analyzer report file. If the argument begins with a slash (/), dot (.), or double dot (..), the output file will be created according to the standard UNIX resolution rules.
- Options: This section contains Boolean options that can be selected by the user. Selecting an option means that parameter will be set to True in the command invocation. Multiple options can be selected by holding down the [Control] key. The slider bar can be used to view additional options.
- Thresholds: Each dialog box may have up to six thresholds. If an Ada Analyzer command has no thresholds, this section does not appear. Threshold values can be changed from their defaults if desired. Selecting the And Threshold Values radio button specifies that all thresholds must be met (the and relationship) to be included in the report output. The default is to or threshold values, meaning that output will be generated if any one threshold value is met. See "Parameter Options" for more information.
Command Logs
Execution of any Ada Analyzer command generates the following log entries:
- An announcement of the current version of the Ada Analyzer, the name of the command, and values of all parameters.
- An announcement of which configuration policy directory (containing switches and other configuration files) will be used during command execution.
- An entry for each compiled Ada unit as it is processed.
- An announcement when traversal is complete, when the tables are sorted, and when each hypertable is written to the report file.
- A full pathname of the report file where all hypertables are permanently saved.
- A summary of any errors reported.
If all goes well, each entry is reported as a positive message (+++). An example log follows:
Warning and Error Messages
Warning (!!!) or error (***) messages also may appear in the log. Each is explained with an example.
Error: Unit Does Not Resolve
If the <list of units> parameter option does not resolve to a set of directory objects, the following error message will be displayed:
Note that this error message is impossible if the file locator in the dialog box is used. This message can appear only when the command line is used to invoke Ada Analyzer commands.
Warning: Object Is Not an Ada Unit
If an object specified by the <list of units> option is not of class Ada, the following warning can be expected in the log:
Warning: Object Is Not Installed or Coded
If an object specified by the <list of units> option is of class Ada but is not installed or coded, the following warning can be expected in the log:
Error: Object Is a Subsystem
If an object specified by the <list of units> option is of class Subsystem, the following error can be expected in the log:
Error: Creating Report Files
If a problem is encountered while creating the report file, a message similar to the following is displayed:
This error message usually implies a naming or access-control problem.
Unexpected Errors
While Ada Analyzer commands are collecting analysis information from Ada units, they may encounter unexpected constructs and raise internal exceptions. To generate as much correct output as possible, these exceptions are caught and reported in the log with the following message. The Ada Analyzer command will continue processing and collecting information, discarding just this construct from the output:
These messages indicate a bug in the Ada Analyzer command and should be reported immediately to Rational Support. Please save the error portion of the log and an image of the Ada context surrounding the reported error line. This will help greatly in resolving the problem.
Storage_Error Exception
Any tool has a capacity limit and can arrive at the maximum storage allowed for execution of that tool. If this occurs, Ada Analyzer commands will attempt to write all information collected up to that processing point into the report file. This will be successful in almost all cases, unless a Storage_Error exception is raised during this process. The following log can be expected in this situation:
Writing the table with incomplete information at least allows the user to see the information collected for the units processed to that point. The best way to complete successfully is to limit the number of units processed or to use threshold and Include_* parameters to limit the amount of items in the output.
Authorization Errors
If either error occurs, another authorization code must be obtained from Rational. See the separate guide, Installing Ada Analyzer for Rational Apex, for more information. Another related error is possible:
If this error occurs, a current user must release his or her token before a new user can execute an Ada Analyzer command.
Token ManagementAs with all layered Rational products, license tokens are used to control simultaneous access to the Ada Analyzer by multiple users. Whenever an Ada Analyzer command is executed or an Ada Analyzer report is viewed by the user, a token is requested from the pool of available tokens. If no tokens are available, an error message is displayed and the command is not executed. If a token is available and taken, it is not returned to the pool until the user exits Apex or executes the Release_Token command. This command must be entered from a shell window (created from the Tools menu) using the command line: aa release_token.
Hypertable Report OutputAll analysis commands generate hypertable reports as their output. Hypertable reports are stored in files with a .aarpt suffix. This indicates that their contents should not be accessed with the standard Apex text editor but with the Ada Analyzer report editor. The report editor can be used to browse reports and extract additional information about the analysis contained in the report. Especially important is the report editor's ability to traverse from entries in hypertables to the actual Ada code from which the entry was derived. This capability is described in more detail below. The other function of the report editor is to manipulate the image of the report (that is, format column size, sort column entries, and elide unwanted columns). Reports can then be printed or written to files in other formats for further processing.
An example directory containing Ada Analyzer report files appears below:
Hypertable reports contain the results of the analysis for a particular Ada Analyzer command. Ada constructs that match the selection criteria for that command appear in the table (one per row) with attributes (information related to each item in the table) appearing in each column of that row. An example of a hypertable follows:
In this table, the Unit column contains the name of the Ada unit where the problem occurs. The next column is the name of the with clause that is unused or misplaced, and the final column (Status) contains a short description of the problem.
Viewing Hypertable Reports with the Report Editor
Hypertables are located in files with a .aarpt suffix. These files can be viewed by placing the cursor on a report file with this suffix and pressing [Visit] or by double clicking with the left mouse button. The Open command on the File menu can also be used. This will display the contents of the report in a window and enable the report-editor commands to inspect and manipulate the report.
Note that by default, report output will be displayed automatically when execution of an Ada Analyzer command completes. The Boolean analysis switch Auto_Visit_Report can be set to False if this is not desired.
Traversal and Explanation
Most hypertable entries are connected to the original Ada constructs from which the information was derived, which is why they are called hypertables. Placing the cursor on the item in the column of interest and pressing [Visit] results in traversal to the Ada construct connected to this table element. Some columns have no connection to the code, to save space and improve the execution time of Ada Analyzer commands. A "greater-than" (>) character in the column header indicates that a traversal connection is present and that [Visit] can be used. The following diagram illustrates this concept:
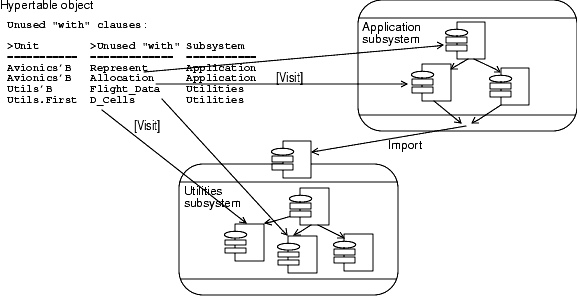
Associated with each column is additional text that more fully describes the contents of each column. Placing the cursor on any column of the hypertable and pressing [Explain] displays the explanatory text in the message window. Each table title also has explanatory information that describes the contents of the table. To see this concept more concretely, look again at the hypertable containing unused with clauses below:
By pressing [Visit] on any entry in the Unit column, you traverse to that Ada unit. Pressing [Visit] on any entry in the second column (Unused "with") displays the unit and highlights the with clause. Since the clause is unused, the Ada object editor can be used to delete it. The Status column is informational only and is not connected to any construct. Columns in other tables are often not connected because connections are expensive in terms of time and memory or there are no unique constructs (not already connected to some other item) to connect them to.
Note that it is possible for the Ada unit to have been changed since the report was generated. The report editor will detect this and display a message in the message window. Visiting the unit with highlighting of the referenced construct will be attempted, but the selected item may not be correct because of the changes made to that unit. If the referenced unit has been deleted, the user will be notified.
In the preceding table, pressing [Explain] on the header of each column displays the following information in the message window:
- Unit: Name of the Ada unit that contains the with clause
- Unused "with": With clause that is unused or misplaced
- Status: Description of the problem
In Chapter 3, "Command Descriptions," each sample output hypertable is accompanied by a description of the [Explain] and [Visit] operations for each table column.
Note: It is possible to customize report and table explanation text as described in "Customized Titles Explanation Text"
Image Manipulation with the Report Editor
The contents of an Ada Analyzer report cannot be modified by the user. It is not possible, for example, to delete or add entries to a report. For this reason, the Edit option has been removed from the File menu.The image of hypertables in an Ada Analyzer report can be manipulated with the report editor. The following changes can be made:
- Columns can be expanded or contracted to better fit the data entries in the column.
- Entire columns can be eliminated (elided) from the image. They can later be unelided as necessary.
- Table entries can be resorted by the contents of a specified column.
- All aspects of table formatting (column size, column elision, and sort order) can be specified in one operation.
- All tables in a report can be sized to fit into an 80-column format or expanded to maximum width. Relative column sizing is preserved.
- Entire tables can be elided from the image. They can later be unelided as necessary.
- Rows can be marked or unmarked. Marked or unmarked rows can be elided (hidden) or unelided.
- Acceptable Report Entries can be marked and saved as required.
Operations to perform these image transformations are located on the View menu. Several also appear on the button bar for easy access. Specific operations are described below.
Expanding and Contracting Columns
The Expand Column operation increases the width of the column in which the cursor is located by one character. The Contract Column operation decreases the width of the column in which the cursor is located by one character. If the cursor is located between tables or is otherwise not located in a column, an error message to that effect is displayed in the message window. If the size of a column is reduced below the number of characters required to display the entire image, the image is abbreviated with a vertical bar (|) appended.
Eliding and Uneliding Columns
The Elide Column operation removes the image of the column in which the cursor is located, replacing it with a vertical line. If the report is then written to a file in another format (see "Alternative File Formats"), this column will not be included in the output. The Unelide Column operation restores the image of the column to the table. The cursor should be placed immediately before the vertical line indicating the elided column for this operation to have effect. The following diagrams illustrate this capability.
Sorting on a Column
The Sort on Column operation resorts the table based on the entries in the column in which the cursor is located. The switches Sort_Ascending on page 28 and Sort_Case_Sensitive also on page 29 govern the sort order.
Searching for Text
The standard Apex text search mechanism can be used in report images to find text strings.
Note: Text replacement is not possible since reports cannot be modified.
Reformatting a Hypertable
The format of a hypertable can be specified with the Format operation. The operation creates a dialog box similar to the following:
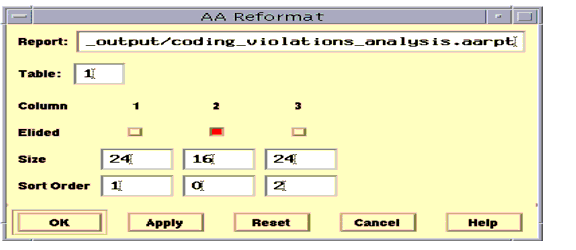
The dialog box will display the current elided state and size for each column in the table. The elided state of a column can be changed by pressing the radio button for that column. The size of each column can be changed from the current value to the number of desired characters. The sort order is initially displayed as all zeros indicating no sorting. Sort _Order values can be changed to indicate sorting precedence. The column with a 1 will have the highest precedence in the sort, the column with a 2 will have the next highest precedence, and so on. Columns with zeros do not participate in the sort. Analysis switches govern case sensitivity and whether the result should be displayed in ascending or descending order.
Fitting Tables to 80 Columns
The Fit to 80 Cols operation expands or contracts columns so that the table fits into 80 columns. This can be convenient for printing purposes. No column is made smaller than 3 characters or larger than 32 characters. The relative size of all columns is preserved whenever possible.
Expanding Table Columns to Maximum Width
The Expand to Max operation expands each column in a table to the maximum width required to display all characters in the column items. This allows the user to see all table data with no abbreviated columns.
Eliding and Uneliding Tables
The Elide Table operation removes the image of the table in which the cursor is located, replacing it with a single line saying that the table is elided. If the report is then written to a file in another format (see "Alternative File Formats" below), this table will not be included. The Unelide Table operation restores the image of the table to the report. The cursor should be placed immediately in the line indicating the elided table for this operation to have effect.
Marking and Unmarking Rows
Operations are available to mark rows in a report, unmark them if necessary, and save only marked or unmarked rows into a report file. The save can overwrite the same permanent report file or be written to a new named report. It is also possible to elide (hide) and unelide all marked or all unmarked rows in a report. These mechanisms provide the capability to select and save only those report row entries of interest and discard or elide all others.
The operation MarkRow will place a `+' sign in front of a table row on which the cursor is placed or on all selected rows in a table. The operation UnmarkRow will similarly remove the `+' sign, thus unmarking those rows. The operation ElideMarked will remove all marked entries from the displayed image of the report. The operation UnelideMarked will add back or display all marked entries. The operations ElideUnmarked and UnelideUnmarked work similarly for unmarked table entries. Note that if both the ElideMarked and ElideUnmarked operations are performed, the image of all tables in the report will be empty.
Two format options Marked_Rows_Only and Unmarked_Rows_Only of the SaveAs operation (page 20) allow only marked rows or only unmarked rows in tables to be written to the specified report filename.
Saving Changes
When changes are made to the image of the report with the report editor, the Save operation on the File menu and corresponding Save button will be ungreyed. This indicates that the image is not the same as the permanent representation of the report in the .aarpt file. The Save or SaveAs operations can be used to store changes permanently in the report file. If the Close operation from the File menu is executed before a Save, then all changes are abandoned and the report file will revert to its former image. The Close operation also removes the window from the screen. In contrast, the Motif close operation in the upper left corner of the window will save changes before removing the window.
Merging and Comparing Reports
When the software under analysis is so large that a single invocation of the Ada Analyzer takes too long or does not complete, analysis can be performed on sections of the code (that is, each subsystem or subdirectory). Separate reports containing analysis of that subset can be generated and later merged into a single report with the Merge_Reports command.
Two reports generated with the same Ada Analyzer command at different times can also be compared for differences with the Compare_Reports command. The output report will contain table entries marked with a "1" if they appear in the first report and not in the second. Output entries will be marked with a "2" if the appears in the second report and not in the first. If the option Include_Matches is enabled and the entry appear in both reports, then the output entry will be marked with a "1/2". This can be used to identify differences between two versions or releases of software. Both commands can be found under the Report Management menu item.
Acceptable Report Entries
The following mechanism defines a list of "acceptable" items reported by the Ada Analyzer. Some coding violations or other reported problems may be deemed acceptable to the software development team for a variety of reasons. It is then tedious when these same items are reported in subsequent runs of Ada Analyzer commands. This mechanism offers a method of defining acceptable entries and filtering out those entries from newly generated reports.
A naming convention is used to find the corresponding report containing acceptable entries for a given report. An acceptable report has the same name as the primary report but is appended with an "_acceptable" suffix. Thus if a report is named "coding_violations.aaprt", the report containing acceptable violations will be named "coding_vioaltions_acceptable.aarpt". The analysis switch, Accepted_Output_Directory, is defined to hold the name of the directory where acceptable reports are located. If the value of the Accepted_Output_Directory resolves to a valid directory, then the Ada Analyzer will look in that directory for the acceptable report name. If the value of this switch is the null string or does not resolve, then the Ada Analyzer will look in the same directory containing the primary report for the corresponding acceptable report.
The SaveAs format option (Marked_Rows_As_Acceptable) will save only marked rows to a report file. This operation will also automatically construct the correct "acceptable" output filename, taking the value of the Accepted_Output_Directory switch into account. Note that it is also possible to manually construct the name of the acceptable report with the Marked_Rows_Only or Unmarked_Rows_Only options.
The report editor operation Mark_Accepted will locate the acceptable report and if found will compare the entries in the primary report with those in the acceptable report. Entries that match identically (except for line numbers) will then be automatically marked (as described above on page 17) in the primary report. If the value of the Auto_Incorporate_Accepted switch is True, any new report that is generated will automatically mark rows from an acceptable report if one with the correct name can be located.
Printing Reports
Ada Analyzer reports can be printed in two ways. The Print operation on the File menu will print the image of the report just as it would any other ASCII file. For PostScript®-quality printing, the following steps must be performed:
- The report must be saved in FrameMaker® MIF, Interleaf® IAF, or Rich Text (RTF) format. See "Alternative File Formats" below for information on how to accomplish this.
- FrameMaker MIF files can then be opened and printed using FrameViewer®. Consult the Rational documentation on how to open and print files using FrameViewer.
- Interleaf can be used to open and print files in the IAF format.
- Several word processing tools accept RTF format as input.
Saving Reports
The Save operation in the File menu and on the button bar saves all changes made to the image of the report back into the .aarpt file. When the file is next opened, the modified format of all tables will be preserved. If you do not want the changes you make to be permanent, you can use the Close operation without first saving it.
Alternative File Formats
Hypertables can be written to files in the following formats:
- Normal: This format writes (saves) the report, retaining the permanent report format.
- Marked_Rows_Only: This format saves only rows that are marked (See "Marking and Unmarking Rows" ) to the specified output report file. The output file is saved with the permanent (Normal) report format.
- Unmarked_Rows_Only: This format saves only rows that are unmarked to the specified output report file. The output file is saved with the permanent (Normal) report format.
- Marked_Rows_As_Acceptable - This format saves all marked rows to a permanent (Normal) report file. The name of the report file will automatically be computed to ensure that is has the correct naming convention to be the primary report's "acceptable" report (See "Acceptable Report Entries" ).
- FrameMaker Interchange Format: This format writes the contents of the report into a file in FrameMaker MIF format. The baseline format for the FrameMaker document is stored in a configuration-policy file and can be modified to change the format of pages and tables in the output. See "FrameMaker Format Files" for more information.
- Interleaf ASCII Format (IAF): This format writes the contents of the report into a file in Interleaf IAF format. The baseline format for the Interleaf document is stored in a configuration-policy file and can be modified to change the format of pages and tables in the output. See "Interleaf Format Files" for more information.
- Rich Text Format (RTF): This format writes the contents of the report into a file in Rich Text RTF format. The baseline format is stored in a configuration-policy file and can be modified to change the format of pages and tables in the output. See "Rich Text Format Files" for more information.
- HTML Format: This format writes the contents of the report into a file in HTML format suitable for reading by on-line browsers. The baseline format is stored in a configuration-policy file and can be modified to change the format of pages and tables in the output. See "HTML Format Files" for more information.
- Formatted ASCII: This format writes each unelided hypertable into the file so that all column entries are fully visible. Columns are as wide as necessary to contain all text. This format is identical to the initial report-editor image created for a report.
- Column-Delimited Text: This format writes each unelided hypertable into the file separated by a blank line. The first line of each hypertable image is its title. The second line contains the headers for each column of the hypertable. Column text is separated by the specified separator character ($ by default). All table rows will then follow, one to a line, with column text separated as above.
Save As
The Save As operation generates the following dialog box:
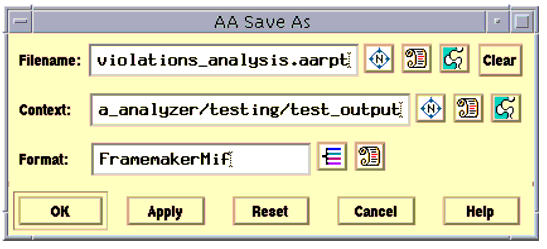
The name of the report to be saved appears in the Filename section of the dialog box. The Context field defines the directory into which the filename will be saved. The Context field will be prefixed to the Filename field if it is not a fully qualified pathname. The Format field defines which format is used to store the file as described above. The alternatives button allows selection of Normal, FrameMaker MIF, Column Delimited, Interleaf, HTML, and ASCII format values. If the Normal file format is selected, the current image of the report will be saved in the filename selected (as in the Save operation). If the FrameMaker MIF format is selected, the report is saved in FrameMaker MIF format. If the Column-Delimited format is selected, the Delimiter field at the bottom of the dialog box specifies the separator character used to delimit columns. If the Interleaf format is selected, the report is saved in Interleaf IAF format. If the HTML format is selected, the report is saved in HTML format suitable for browsing. If the ASCII format is selected, the ASCII image of the report is saved in the specified filename.
If the boolean switch Include_Table_Explanation_Text_In_Ascii_Output is true, the explanation text (either predefined or customized) will be written to the ascii file before the table title. Report header explanation text will also be added. If false (the default, no explanation text will be included. This applies to all ascii output formats including ascii, HTML, Interleaf, RTF, and Framemaker MIF.
Online DocumentationAn online version of this document is available through the Help item of the Analyzer menu.This operation will take you to an online copy of this manual, including its own separate index. Pressing the Help button in any Ada Analyzer dialog box or using Help:On Context will take you to the section of the Ada Analyzer User's Guide that describes the specified command or operation.
Configuring the Ada AnalyzerThe Ada Analyzer is designed to be configurable. A set of file-based switch values is available to accomplish the following:
- Store preset values for use as default options to commands.
- Determine whether the names of the containing unit and subsystem should appear in the output and the format for those names.
- Set various other configuration parameters described below.
Configuration Structure and Content
All Ada Analyzer configuration switches and files are located in directories with the following structure:
default_configuration/
  ada_repair/
    declaration_mapping
  annotation_collection/
    annotation_collection_status
  compatibility/
    development_libraries
    known_pragmas
    reserved_names
    rule_enforcement
  framemaker_formats/
    listing_formats.mif
    report_formats.mif
html_formats/ listing_formats.html report_formats.html interleaf_formats/ listing_formats.iaf report_formats.iaf metrics_collection/ cmvc_metrics_descriptionhalstead_metrics_description line_counting_description metrics_collection_status metrics_explanations_and_titles oo_metrics_description subprogram_metrics_description rtf_formats/ listing_formats.rtf report_formats.rtfsubprogram_frame_sizing standards_conformance/ allowed_name_abbreviations allowed_use_clauses annex_d_enforcement annex_h_enforcement approved_renames expression_depth_limit maximum_protected_entries maximum_select_alternatives maximum_subprogram_size maximum_task_entries maximum_unit_size mccabe_complexity_limit name_selection_limit named_loop_size naming_conventions package_nesting_limit prohibited_attributes prohibited_namesravenscar_enforcement return_type_limit rule_enforcement rule_enforcement_interactive rule_explanations_and_titles spark_enforcement spc_enforcementsubprogram_nesting_limit subtype_nesting_limit analysis_switch_file command_table_explain_text excluded_units type_sizing_file type_sizing_name_mapThe Check_Consistency command on the Configuration Policy item of the Analyzer menu can be used to verify that the structure of a configuration-policy directory is correct and that all files are present. This command can also be used to add missing files to older configuration-policy directories.
The Check_Consistency command creates the following dialog box:
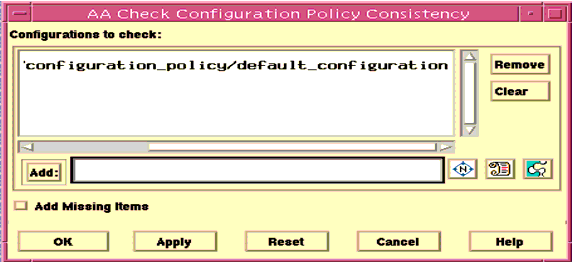
The locator at the top of the box can be used to specify configuration-policy directories to check. The radio button at the bottom can be pushed to indicate that any missing files should be copied from the default configuration policy into the configuration policy missing the file.
Since all configuration information is stored in the files shown above, it can be updated with the Apex text editor. This is the easiest and most straightforward way to change the configuration of the Ada Analyzer. Required formats are described in each file and in this document. Most files contain lists of simple names, one to a line. Others define the value assigned to a named entity (that is, named_entity => value).
Multiple Configuration Policies
It is possible to have several configuration-policy directories, each with different settings. These can be located at either the project or the user level. The $AA_HOME/configuration_policy directory is the recommended place to store all project-level configuration policies. It is possible, of course, to put configuration-policy directories elsewhere in the directory structure, but that is not recommended. The following is an example of a configuration-policy directory containing several named configurations:
In this case, there are three configuration policies: the default_configuration supplied with the Ada Analyzer and two project configurations called configuration_1_2 and verification_configuration. Each should have the structure shown in the earlier diagram.
There are two methods available for specifying which configuration-policy directory should be considered the current configuration policy and used for all Ada Analyzer commands. A file called current_configuration within the configuration_policy directory can be used to store the pathname of the configuration-policy directory that should be considered "current". This should be a fully qualified pathname to the desired configuration-policy directory.
An alternative method of specifying the current configuration policy is to use an environment variable. The $AA_CONFIG_POLICY_DIR environment variable can be used to designate the pathname of the configuration-policy directory to use. If $AA_CONFIG_POLICY_DIR contains a valid pathname, its contents takes precedence and it will be used to designate the current configuration policy to use with all commands. If $AA_CONFIG_POLICY_DIR has a null value, then the contents of the current_configuration file will be used. Although use of the environment variables may be more convenient for some users, they can only be set before Apex is initialized. If a user wishes to change the value of the $AA_CONFIG_POLICY_DIR environment variable, they must first exit Apex, set the variable to a new value, and then re-initialize Apex for the change to have an effect.
You can create your own personal configuration by duplicating this structure in your home directory. This can be accomplished easily with the Create_New command on the Configuration Policy item of the Analyzer menu. This command creates a new configuration by copying an existing configuration-policy directory into a new context. If no context parameter is specified, the new configuration is created in the user's home directory including the configuration_policy directory and the current_configuration file if necessary. Note that this command also can be used to create new project-level configurations in any context. The Create_New command has the dialog box on the next page.
The single-object locator (labeled From Configuration) at the top of the dialog box can be used to specify the configuration-policy directory to copy when creating the new configuration policy. The New Configuration field specifies the simple name of the configuration-policy directory to create. The Context field is left empty by default but can be changed to any other directory context. A configuration-policy directory with the name specified in the New Configuration field will be created in the specified context directory.
Determining the Currently Active Configuration Policy
When Ada Analyzer commands are executed, the following algorithm is used to determine which configuration policy to use:
- 1. If $AA_CONFIG_POLICY_DIR contains a valid pathname, then use its contents to locate the current configuration-policy directory. If $AA_CONFIG_POLICY_DIR contains a null or invalid value, then continue to step 2.
- 2. If the user's home library contains a directory called configuration_policy, it is used to complete step 3. Otherwise, step 3 is completed with the configuration_policy directory in $AA_HOME.
- 3. Locate the actual configuration. If a file named current_configuration exists within the configuration_policy directory found in step 1, its contents are read to retrieve the path-name of the actual configuration-policy directory to use for command execution. If this file does not exist, if the pathname does not resolve, or if the resolved object is not a configuration-policy directory, the default_configuration in $AA_HOME is used for command execution.
The selected configuration is always displayed as part of the command log. A command called Visit Current in the Configuration Policy menu is available to traverse to the currently active configuration-policy directory.
Customized Titles Explanation Text
It is possible to customize the table title and explanation text in reports for most Ada Analyzer commands. This allows projects the ability to define their own titles and descriptions of coding violations, metrics, and most other items reported by the Ada Analyzer.
The Ada Analyzer switch, Use_File_Based_Explain_Text (page 29) governs whether this mechanism is used or not. If the value of the switch is false (the default), then predefined titles and explanations will be used. If enabled, the customization files command_table_explain_text (page 40), standards_conformance/rule_explanations (page 39), and metrics_collection/metrics_explanations (page 35) will be consulted for table titles and explanation text. Explanations can be simple text, a reference to a description located in a file, or a reference to a file containing HTML help text(page 41). Title text may only be simple text and will be copied verbatim into the title area of a report table.
Analysis Switches
This section describes the switches that govern general operation of the Ada Analyzer. Each switch name is followed by the kind of input expected (shown in parentheses) and a description of the switch.
- Accept_User_Defined_Arithmetic_Operators (Boolean): Specifies whether user-defined numeric operators (for example: * or /) should be interpreted with their usual meaning of multiply and divide. If this switch is True, evaluation of static expressions containing these operators will continue using universal arithmetic. If False, the expression will be considered nonstatic (that is, dependent on the implementation of the operator). Default Value: True.
- Accepted_Output_Directory (String): Defines where "acceptable" ( page 18) report files will be located. If the value of this switch is the null string, acceptable report files must be located in the same directory as the primary report. If this switch contains a valid directory pathname, acceptable report files will be located there. Default value: null string.
- Add_Hypertable_Linkage (Boolean): Specifies whether or not to add hypertext links to the output reports created by all Ada Analyzer commands. Setting this switch to False can save time and space when the report is intended for hard-copy documentation only. Default Value: True.
- Add_Performance_Summary (Boolean): Specifies whether or not a summary of performance should be added to the end of the report. If this switch is True, the number of units processed and the amount of time required to perform each analysis process will be added to the report. Wall clock, user cpu, and system cpu times are reported. Default Value: False. Note that some commands that generate hierarchical reports (specifically Display_Call_Tree, Display_With_Closure, Display_Subsystem_Import_Closure, and Display_Expanded_Type_Structure) do not have unit performance summaries.
- Add_Unit_Column_Linkage (Boolean): Specifies whether or not to add a hypertext link to the Unit column in output reports created by many Ada Analyzer commands. This switch is set by default to False to save time and space when the addition of this linkage is not required. If the Add_Hypertable_Linkage switch is False, no linkage will be added to the report even if the value of this switch is True. Default Value: False.
- Analysis_Output_Directory (String): Specifies the pathname of the directory in which all analysis report files should be created. Default Value: "/tmp".
- Attempt_Analysis_Of_Uninstalled_Units (Boolean): Specifies whether or not to attempt analysis processing on units that are not in the installed or coded state. This switch is intended to allow analysis of units that are actually installed and analyzable but falsely reported by ASIS as uninstalled. It is not intended to facilitate analysis of units that are known to be uninstalled (that is, those that will not compile). Default Value: False.
- Auto_Elide_Empty_Tables (Boolean): Specifies whether empty tables should be placed in the elided state when the report is first generated. The report editor can then be used to unelide tables as necessary. Default Value: False.
- Auto_Incorporate_Accepted (Boolean): Specifies whether or not new reports should automatically have their acceptable entries marked. If this switch is True, an attempt will be made to locate an acceptable report file. Entries that appear in both reports will be marked in the new report. Default value: False.
- Auto_Visit_Report (Boolean): Specifies whether or not to automatically visit the generated report after the analysis command completes. Default Value: True.
- Check_For_Report_Overwrite (Boolean): Specifies whether or not to check if the output report file already exists before creating a new report. If this switch is True and the report file already exists, a dialog box will appear asking if the report should be overwritten. If the user accepts overwriting, the Ada Analyzer command will continue normally. If the user indicates that the report should not be overwritten, control will return to the command dialog box so that the user may change the report name. Default Value: True.
- Check_Units_For_Latest_Cmvc_Version (Boolean): Specifies whether or not to check if the current version of any processed unit is the latest version. If this switch is True and the unit is not the latest version, a warning will be written to the log indicating that the command is not analyzing the most current version of the unit. Default Value: False.
- Compute_Closure (Boolean): Specifies whether to compute the transitive link closure of the units specified for analysis and then analyze the resulting units list. The resulting list includes all units that would be required for execution including bodies and subunits of the compilation closure. Note that in the case where a with clause is present but not actually used, a linker may leave this unused unit out of the resulting executable. The computation of closure with this switch will always include the unit if a with clause for it is present. This switch can be useful for limiting traversal to one main program. Default Value: False. Note that this switch can also be set by a radio button in most command dialog boxes. If set in the dialog box, the Compute_Closure is set to True. Otherwise, the switch value from the Analysis_Switches file is used.
- Compute_Overload_Nicknames (Boolean): Specifies whether or not to compute a nickname number for overloaded subprograms. If this switch is True, the names of all overloaded subprograms will be appended with a number indicating its order of appearance in the enclosing program unit. Default Value: False.
Note: This switch should be used only when necessary to resolve overloading since it is somewhat computation intensive.
- Display_Subsystem_Names (Boolean): Specifies whether the name of the subsystem containing each table element should be included as a column in the hypertable output. Default Value: False.
- Display_Unit_Names (Boolean): Specifies whether the name of the unit containing each table element should be included as a column in the hypertable output. Default Value: True.
- Full_Pathname_Display_Option (Enumerated): Specifies how references to objects should be displayed in tool output. Options:
- Full_Name: Fully qualified UNIX pathname (example: /projects...).
- Simple_Name: Simple Ada name of the object.
- Simple_Name_With_Kind_Attribute: Simple name including 'Spec or 'Body.
- Simple_Name_With_Abbreviated_Kind_Attribute: Simple name including 'S or 'B.
- Ada_Name: Simple name for units; qualified name for subunits.
- Ada_Name_With_Kind_Attribute: Simple name for units; qualified name for subunits including 'Spec and 'Body.
- Ada_Name_With_Abbreviated_Kind_Attribute: Simple name for units; qualified name for subunits including 'S and 'B.
- Include_Line_Numbers (Boolean): Specifies whether to include a line-number reference in the image of the unit name. This is used mostly when hard copy is required for use as cross-reference into program listings. It can also be set to differentiate calls to overloaded subprograms in the Display_Call_Tree report. Default Value: False.
- Include_Unit_Version (Boolean): Specifies whether or not to include the version number in the image of the unit column. If this switch is True, a "Ver: #" will be appended to the unit name image. A zero value indicates that the unit is not controlled. Default Value: False.
- Include_Unit_History (Boolean): Specifies whether or not to include the unit history in the image of the unit column. If this switch is True, a "Hist: history_name" will be appended to the unit name image. If the unit is not controlled, the history_name will be blank. Default Value: False.
- Include_Program_Unit_Container (Boolean): Specifies whether or not to include the name of the program unit containing the Ada construct in the image of the unit column. If this switch is True, the name of the containing subprogram, task, or nested package will be appended to the unit name image. Default Value: False.
- Include_Table_Explanation_Text_In_Ascii_Output (Boolean): Specifies whether or not explanation text should be included in the generation of reports in alternative file formats (See page 19). If this switch is True, the explanation text associated with a table will be written into the file after the table title. File formats supported are ascii, HTML, Interleaf, RTF, and Framemaker MIF. Default value: False.
- Interleaf_File_Suffix (String): Specifies the suffix to use when saving reports in Interleaf format. Default value: .iaf.
- Max_Column_Width (Positive): Specifies the maximum number of characters that a column in a report table may contain. This is useful when one column entry is very large, distorting the formatting of the report. Default Value: 256.
- Max_Number_Of_Compilation_Units (Positive): Specifies the maximum number of compilation units that can be analyzed at any one time. Setting this number to a lower value may improve execution performance. Default Value: 1000.
- Print_Error_Summaries (Boolean): Specifies whether or not to summarize all error logs at the end of the log output. If this switch is True, the total number of errors and the first text line of each error will be displayed at the end of the log for easy viewing. Default Value: False.
- Print_Warning_Summaries (Boolean): Specifies whether or not to summarize all warning logs at the end of the log output. If this switch is True, the total number of warnings and the first text line of each warning will be displayed at the end of the log for easy viewing. Default Value: False.
- Project_Software_Configuration (String): Specifies the pathname of the project configuration containing subsystem entries for all software to be analyzed. Default Value: null string.
- Remove_Subsystem_SS_Suffix (Boolean): Specifies whether or not to remove the .ss suffix from subsystem names included in a report. Default Value: False.
- Sort_Ascending (Boolean): Specifies the resulting display order of a sorting operation. If this switch is True, entries will be sorted with the smallest value at the top of the report table, ascending to the largest value at the bottom. If this switch value is False, the reverse order will be presented.
- Sort_Case_Sensitive (Boolean): Specifies whether sorting operations should order string-value column entries in a case-sensitive manner or not. If this switch is True, entries will be sorted in a case-sensitive manner with all lower case letters appearing before upper case. Default Value: False.
- Sort_Order (Enumerated): Specifies the order in which table information is sorted. Options:
- Default_Sort: Sort left to right by column.
- Sort_By_Subsystem: Sort by subsystem name first, then unit name, and then left to right by each element attribute.
- Subsystem_Name_Abbreviation_Policy (Enumerated): Specifies how subsystem names should be abbreviated in table output. Options:
- No_Abbreviation: Take the name in its full form.
- First_N_Characters: Take the first n characters of the name (see the switch Subsystem_Name_Minimum_Abbreviated_Length, below).
- First_N_That_Differentiate: Take the first n characters that form a unique name set but contain at least the number of characters in Subsystem_Name_Minimum_Abbreviated_Length.
- First_N_Of_Each_Segment: Take the first n characters of each name segment (see Subsystem_Name_Minimum_Abbreviated_Length, below).
- First_N_Of_Each_Segment_That_Differentiate: Take the first n characters from each segment to form a unique name set, but at least the number of characters in Subsystem_Name_Minimum_Abbreviated_Length, below.
- Subsystem_Name_Minimum_Abbreviated_Length (Positive): Specifies the minimum number of characters in any abbreviated subsystem name or segment. Default Value: 4.
- Unit_Name_Display_Option (Enumerated): Determines how unit names should be displayed in table output. See the switch Full_Pathname_Display_Option, above, for options. Default Value: Ada_Name_With_Kind_Attribute.
- Use_Expanded_Interactive_Explanations (Boolean): Specifies whether to use expanded or abbreviated explanations for interactive rule violations. The expanded form (including a textual description of the rule) may be more appropriate early in software development when rules are not well known by developers. The abbreviated form (rule name only) may be more appropriate in later development phases or well developers only need a simple reminder or which violation is indicated.Default value: False.
- Use_File_Based_Explain_Text (Boolean): Specifies whether to extract table title and explanation text for all report tables from configuration policy files. If this switch is True, an attempt will be made to read the command_table_explain_text file, the standards_-conformance/rule_explanations file, and the metrics_collection/metrics_explanations file for text describing report table or rules (see page 25).Default value: False.
- Use_View_Relative_Output (Boolean): Specifies whether or not to compute the output path for the report relative to the view in which the command was executed. If the pathname specified in the Analysis_Output_Directory switch is fully qualified (that is, begins with "/") then this pathname will be used to store all output files. If this switch is True, and the pathname specified in the Analysis_Output_Directory switch is not fully qualified, then the Analysis_Output_Directory pathname will be used to specify a subdirectory within the view in which the command was executed. Default value: False.
Editing Analysis Switches
Analysis switches are stored in the file named analysis_switch_file in the configuration-policy directory. They can be edited with the Apex text object editor. The format for entries (one per line) in the file is:
These switch values are loaded from the analysis_switch_file into memory each time an Ada Analyzer command executes. Values are checked to see that they have the correct format (Boolean, Integer, String) and in some cases that they resolve to the right kind of objects (Project_Software_Configuration, for example). Errors are reported in the command log before tool execution starts. The following log is an example of the kinds of errors that can occur:
Environment-Variable Switches
It is also possible to set Ada Analyzer analysis switches with an environment variable. The name of the environment variable can be constructed by appending AA_ to the fully uppercase switch name. This alternative allows switches to be set without modifying the analysis_switch_file in the configuration-policy directory
Configuration-Policy Files
The following configuration files are used to modify the behavior of specific Ada Analyzer commands. Each file description includes the commands that use this information to perform their analysis and the expected format of data, if any.
Wildcards
A limited form of name wild-carding can be used to specify names in configuration-policy files. Two wildcard characters are available:
- The `*' character can be used to match any number of characters.
- The `#' character can be used to match any single character.
Thus, the wildcard string "*Bob##" would match "Jim Bob L" or "Billy Bob's" but not "Jim Bo's" or "Bill Bobby's". Files allowing wildcards are so specified.
Ada Repair Files
The configuration file in this section support the declaration renaming capability of the Ada Repair command. It use is described in "Specifying Declarations to Rename or Move" on page 340.
- declaration_mapping file
Command referencing this file: Repair_Violations
Annotation Analysis Files
The configuration file in this section supports the analysis of structured annotations (comments) embedded in software.
- annotation_collection_status file
Command referencing this file: Locate_Annotations
This file specifies how annotations should be recognized and how information about them should be collected. The format of an annotation is specified by a start string ("-- @", for example) and an end string (perhaps ":"). The Locate_Annotations command would then recognize annotations of the form "-- @Annotation_Name:". In most cases, some amount of text would follow the end string. A Boolean field in the annotation_collection_status file specifies whether annotations should appear before or after constructs (like declarations or statements). Each annotation definition specifies a name, a status (whether the attachment is optional, mandatory, or prohibited), and a construct to which the annotation may be, must be, or may never be attached. The list of supported constructs are a compilation-unit specification, a compilation-unit body or subunit, a type declaration, an object declaration, a subprogram specification, a subprogram body, or any other declaration or statement. Annotation names can be specified more than once to require an annotation on one construct and prohibit it on another. The current contents of this file provides an example which can be modified by the user.
Compatibility Files
Configuration files in this section support the checking of code for compatibility with other compilation systems.
- development_libraries file
Command referencing this file: Locate_Compatibility_Problems
This file is a list of development subsystems containing Ada units developed in the project under analysis. References to Ada units are checked against this list to ensure that all references are made to units in these development libraries. References to Ada units not located in these libraries are considered "external references." This file can be used to find references to Ada units that would not be recognized by the remote compilation system.
- known_pragmas file
Command referencing this file: Locate_Compatibility_Problems
This file contains a simple list of pragma names recognized by the remote compiler. Pragmas in the code are checked against this list to make sure they match. Since pragmas that are not implemented are not reported as errors by Ada compilers, this file can be used to locate pragmas not recognized by the target compiler.
- reserved_names file
Command referencing this file: Locate_Compatibility_Problems
This file contains a list of names reserved by the remote compiler and therefore prohibited from use with the Apex host compiler. This file allows wildcards in names.
- rule_enforcement file
Command referencing this file: Locate_Compatibility_Problems
This file specifies which compatibility rules are enabled and whether they should be reported as errors or warnings. The format for all entries in this file is:
where Enforcement is either Not_Enforced, Error, or Warning.
The following is an example image of the rule_enforcement file:
FrameMaker Format Files
Configuration files in this section support the generation of code listing and reports in FrameMaker Interchange Format (MIF). These files contain the baseline definitions for the documents generated for FrameMaker or FrameViewer.
- listing_formats.mif file
Command referencing this file: Generate_Listing
This file contains a sequence of MIF statements that are copied at the beginning of the resulting MIF file. They define the document attributes, page layout, headers, footers, and default fonts for code listings. These formats can be changed if a different default format is desired. Consult the FrameMaker documentation for more information.
- report_formats.mif file
Operations referencing this file: Save As, Write_To_Ascii_File
The Ada Analyzer report editor provides the Save As option to save the image of a report in several alternative formats (see "Alternative File Formats"). One alternative format is FrameMaker MIF format. This file contains a sequence of MIF statements that are copied at the beginning of the resulting MIF file. They define the document attributes, page layout, headers, footers, and default fonts for reports. These formats can be changed if a different default format is desired. Consult the FrameMaker documentation for a description of MIF statements and their syntax.
HTML Format Files
Configuration files in this section support the generation of code listing and reports in HTML. These files contain the baseline definitions for the documents generated for on-line browsing.
- listing_formats.html file
Command referencing this file: Generate_Listing
This file contains a sequence of HTML statements that are copied at the beginning of the resulting HTML file. These formats can be augmented or changed if a different default format is desired. Consult the HTML documentation for more information.
- report_formats.html file
Operations referencing this file: Save As, Write_To_Ascii_File
The Ada Analyzer report editor provides the Save As option to save the image of a report in several alternative formats (see "Alternative File Formats"). One alternative format is HTML format. This file contains a sequence of HTML statements that are copied at the beginning of the resulting HTML file. These formats can be augmented or changed if a different default format is desired. Consult the HTML documentation for a description of HTML markup commands and their syntax.
Interleaf Format Files
Configuration files in this section support the generation of code listing and reports in Interleaf ASCII Format (IAF). These files contain the baseline definitions for the documents generated for Interleaf.
- listing_formats.iaf file
Command referencing this file: Generate_Listing
This file contains a sequence of IAF statements that are copied at the beginning of the resulting IAF file. They define the document attributes, page layout, headers, footers, and default fonts for code listings. These formats can be changed if a different default format is desired. Consult the Interleaf documentation for more information.
- report_formats.iaf file
Operations referencing this file: Save As, Write_To_Ascii_File
The Ada Analyzer report editor provides the Save As option to save the image of a report in several alternative formats (see "Alternative File Formats"). One alternative format is Interleaf IAF format. This file contains a sequence of IAF statements that are copied at the beginning of the resulting IAF file. They define the document attributes, page layout, headers, footers, and default fonts for reports. These formats can be changed if a different default format is desired. Consult the Interleaf documentation for a description of IAF statements and their syntax.
Rich Text Format Files
Configuration files in this section support the generation of code listing and reports in Rich Text Format (RTF). These files contain the baseline definitions for the documents generated for word processing programs supporting RTF.
- listing_formats.rtf file
Command referencing this file: Generate_Listing
This file contains a sequence of RTF statements that are copied at the beginning of the resulting RTF file. They define the document attributes, page layout, headers, footers, and default fonts for code listings. These formats can be changed if a different default format is desired. Consult the Rich Text Format documentation for more information.
- report_formats.rtf file
Operations referencing this file: Save As, Write_To_Ascii_File
The Ada Analyzer report editor provides the Save As option to save the image of a report in several alternative formats (see "Alternative File Formats"). One alternative format is RTF format. This file contains a sequence of RTF statements that are copied at the beginning of the resulting RTF file. They define the document attributes, page layout, headers, footers, and default fonts for reports. These formats can be changed if a different default format is desired. Consult the Rich Text Format documentation for a description of RTF markup commands and their syntax.
Metrics-Collection Files
Configuration files in this section support the qualification of code with metrics.
- metrics_collection_status file
Command referencing this file: Collect_Metrics
This file contains a list of each enabled metric. All entries should have the form:
Note that some metrics do not support collection for all status values. The McCabe metric does not support Collection_By_Compilation_Unit, for example.
<Weight> can be any positive integer.
<Name> can be any string less than or equal to 64 characters.
- cmvc_metrics_description file
Command referencing this file: Collect_Metrics
This file contains a general description of cmvc metrics and a specific description of each cmvc metric. This text is used if the Use_File_Based_Explain_Text switch is set to True.
- halstead_metrics_description file
Command referencing this file: Collect_Metrics
This file contains a general description of halstead metrics and a specific description of each cmvc metric. This text is used if the Use_File_Based_Explain_Text switch is set to True.
- line_counting_description file
Command referencing this file: Collect_Metrics
This file contains a general description of line counting metrics and a specific description of each line counting metric. This text is used if the Use_File_Based_Explain_Text switch is set to True.
- oo_metrics_description file
Command referencing this file: Collect_Metrics
This file contains a general description of OO (object oriented) metrics and a specific description of each oo metric. This text is used if the Use_File_Based_Explain_Text switch is set to True.
- subprogram_metrics_description file
Command referencing this file: Collect_Metrics
This file contains a general description of subprogram metrics and a specific description of each subprogram metric. This text is used if the Use_File_Based_Explain_Text switch is set to True.
- metrics_explanations_and_titles file
Command referencing this file: Collect_Metrics
This file defines table titles and descriptions for each metric table. Currently, this file points via pathnames to the above files for specific descriptions of each metric. This text is used if the Use_File_Based_Explain_Text switch is set to True. Entries in this files should have the format:
where <explanation text> is either a string of text, a pathname to a file containing the explanation text, or a help reference (see page 41). Pathnames may contain valid environment variables of the form $Environment_Variable_Name which will be expanded before resolution. <title text> may only be simple text and will be copied verbatim into the title of the table. Metric table names are those defined with the Table_Name attribute in the metrics_collection/metrics_collection_status file.
Standards-Conformance Files
Configuration files in this section support checking code against project coding standards.
- allowed_name_abbreviations file
Commands referencing this file: Locate_Misspellings, Locate_Name_Anomalies
This file contains a list of simple names that are allowed in declarations or as segments of declared names. For example, if the name "Abbrev" is placed in this file, names such as "Abbrev" and "An_Abbrev" are accepted as valid by the above commands and not included in the output of misspelled words. This file allows wildcards in names.
- allowed_use_clauses file
Commands referencing this file: Locate_Coding_Violations, Locate_Use_Clauses
This file contains a list of library-unit names that can appear in use clauses. All other names appearing in use clauses are reported as invalid by the Locate_Coding_Violations command. Names should appear one to a line. This file allows wildcards in names.
- annex_d_enforcement file
Command referencing this file: none
This file contains enforcement for all Annex D coding violation restrictions. It can be used to modify other rule_enforcement files.
- annex_h_enforcement file
Command referencing this file: none
This file contains enforcement for all Annex H coding violation restrictions. It can be used to modify other rule_enforcement files.
- approved_renames file
Command referencing this file: Locate_Coding_Violations
This file contains a list of approved names that can be used in a renaming clause (that is, a list of declarations that can be renamed by a renaming clause). All other names appearing in renaming clauses are reported as invalid by the Locate_Coding_Violations command. Names should appear one to a line. This file allows wildcards in names.
- expression_depth_limit file
Command referencing this file: Locate_Coding_Violations
This file contains a single integer value indicating the maximum nesting depth that an expression may have and not be considered a violation by the Locate_Coding_Violations command.
- maximum_protected_entries file
Command referencing this file: Locate_Coding_Violations
This file contains a single integer value indicating the maximum number of entries a protected type may have and not be considered a violation by the Locate_Coding_Violations command.
- maximum_select_alternatives file
Command referencing this file: Locate_Coding_Violations
This file contains a single integer value indicating the maximum number of alternatives a select statement may have and not be considered a violation by the Locate_Coding_Violations command.
- maximum_subprogram_size file
Command referencing this file: Locate_Coding_Violations
This file contains a single integer value indicating the maximum number of lines a subprogram may have and not be considered a violation by the Locate_Coding_Violations command.
- maximum_task_entries file
Command referencing this file: Locate_Coding_Violations
This file contains a single integer value indicating the maximum number of entries a task may have and not be considered a violation by the Locate_Coding_Violations command.
- maximum_unit_size file
Command referencing this file: Locate_Coding_Violations
This file contains a single integer value indicating the maximum number of lines a unit may have and not be considered a violation by the Locate_Coding_Violations command.
- mccabe_complexity_limit file
Command referencing this file: Locate_Coding_Violations
This file contains a single integer value indicating the maximum McCabe complexity that a task or subprogram may have and not be considered a violation by the Locate_Coding_Violations command.
- name_selection_limit file
Command referencing this file: Locate_Coding_Violations
This file contains a single integer value indicating the maximum number of dot selections that a reference may have and not be considered a violation by the Locate_Coding_Violations command. If the limit specified were 2, the name reference Pkg.Nested.Obj.Comp would violate this rule.
- named_loop_size file
Command referencing this file: Locate_Coding_Violations
This file contains a single integer value indicating the maximum size that an unnamed loop statement may have and not be considered a violation by the Locate_Coding_Violations command.
- naming_conventions file
Command referencing this file: Locate_Coding_Violations
This file specifies one or more naming conventions. It is possible to specify a
- Required_Prefix
- Required_Suffix
- Required_Segment (Ada name separated by underbar characters)
- Prohibited_Prefix
- Prohibited_Suffix
- Prohibited_Segment
for each name. Some declarations (such as type, renaming, and generic formal parameter declarations) have an entry for the general declaration, such as A_Type_Declaration and more specific entries such as A_Float_Type_Declaration for each kind of type declaration.
- <unit_name> - Specifies the name of the unit containing the declaration.
- <subsystem_name> specifies the name of the subsystem containing the unit with the declaration.
Finally it is possible to specify abbreviations for special names. This is accomplished with an entry of the form:
If an abbreviation is used, the required or prohibited segment, will be the abbreviated unit name or subsystem name instead of the full name. All naming convention entries are not case sensitive.
- package_nesting_limit file
Command referencing this file: Locate_Coding_Violations
This file contains a single integer value indicating the maximum nesting depth that a package may have and not be considered a violation by the Locate_Coding_Violations command.
- prohibited_attributes file
Commands referencing this file: Locate_Coding_Violations
This file contains a list of attribute names that are prohibited. Attributes with these names will be reported as a violation by the Locate_Coding_Violations command.
- prohibited_names file
Commands referencing this file: Locate_Coding_Violations, Locate_Misspellings, Locate_Name_Anomalies
This file contains a list of text strings that may not appear in a program (Locate_Misspellings) or may not appear in a declaration name (Locate_Name_Anomalies). These names will also be considered by the Locate_Coding_Violations command. Names should appear one to a line. This file allows wildcards in names.
- ravenscar_enforcement file
Command referencing this file: none
This file contains enforcement for all coding violation restrictions that confirm the Ravenscar Tasking Profile. It can be copied into the rule_enforcement file to enable these rules.
- return_type_limit file
Command referencing this file: Locate_Coding_Violations
This file contains a single integer value indicating the maximum size (in bytes) that a type returned by a function may have and not be considered a violation by the Locate_Coding_Violations command. If the limit specified were 2, the name reference Pkg.Nested.Obj.Comp would violate this rule.
- rule_enforcement file
Command referencing this file: Locate_Coding_Violations
This file specifies which of the standards-conformance rules supported by the Ada Analyzer are enabled and whether they should be reported as errors or warnings. See "Standards-Conformance and Compatibility Rule Libraries" on page 299 for a list of all supported rules and their default enforcement. The format for all entries in this file is:
where Enforcement is either Not_Enforced, Error, or Warning.
- rule_enforcement_interactive file
Command referencing this file: Locate_Coding_Violations_Interactively
This file specifies which of the standards-conformance rules supported by the Ada Analyzer are enabled for interactive analysis and whether they should be reported as errors or warnings. See "Standards-Conformance and Compatibility Rule Libraries" on page 299 for a list of all supported rules and their default enforcement. The format for all entries in this file is:
where Enforcement is either Not_Enforced, Error, or Warning.
- rule_explanations_and_titles file
Command referencing this file: Locate_Coding_Violations
This file defines table titles and explanation text for standards-conformance and compatibility rules. Entries in this files should have the format:
Explanation_For_<Rule_Name> => <explanation text>
Title_For_<Rule_Name> => <title text>
where <explanation text> is either a string of text, a pathname to a file containing the explanation text, or a reference to a help file (see page 41). Pathnames may contain valid environment variables of the form $Environment_Variable_Name which will be expanded before resolution. <title text> may only be simple text and will be copied verbatim into the title of the table.
If the Use_File_Based_Explain_Text switch is enabled, the title and explanation text defined for each rule will be stored and used for the table containing rule violations in the report. If the user places their cursor on the table title and hits the Explain operation, the customized explanation text will be displayed in the message window. If the text is a valid pathname, that file will be displayed. If the text is a help reference, then that help file will be displayed.
- spark_enforcement file
Command referencing this file: none
This file contains enforcement for all SPARK coding violation restrictions. It can be used to modify other rule_enforcement files.
- spc_enforcement file
Command referencing this file: none
This file contains enforcement for all Software Productivity Consortium checks. See "Software Productivity Consortium's Guidelines" on page 300 for a list of these rules and their default enforcement. It can be used to modify other rule_enforcement files.
- subprogram_nesting_limit file
Command referencing this file: Locate_Coding_Violations
This file contains a single integer value indicating the maximum nesting depth that a subprogram may have (that is, subprograms declared within other subprograms) and not be considered a violation by the Locate_Coding_Violations command.
- subtype_nesting_limit file
Command referencing this file: Locate_Coding_Violations
This file contains a single integer value indicating the maximum nesting depth that a subtype may have (that is, subtype declarations that specify another subtype as its type mark) and not be considered a violation by the Locate_Coding_Violations command.
Other Configuration Files
These configuration files appear immediately within the configuration-policy directory and apply to multiple Ada Analyzer commands.
- analysis_switch_file file
Commands referencing this file: All commands
This file contains switch settings for all Ada Analyzer commands, as described on page 25.
- command_table_explain_text file
Commands referencing this file: All commands except those excluded below.
This file contains definitions for command table titles and explanations. The required format of this file is:
COMMAND: <name of Ada Analyzer command>
HEADER_EXPLANATION => <explain text for report header>
EXPLANATION_TABLE_1 => <explain text for table 1)
TITLE_TABLE_1 => <title text for table 1)
EXPLANATION_TABLE_2 => <explain text for table 2)
These entries would define title text for table 1 and explanation text for table 1 and table 2 of the named command. It would also define customized explanation text for the header of this report. Note that the Header_Explanation field is optional. If missing, pressing the explain key on a report header will display the predefined documentation for that command. It is also not necessary to define titles or explanations for all command tables. If new text for a table is not defined, the predefined text will be used.
COMMAND: <name of Ada Analyzer command>
EVERY_TABLE_EXPLANATION => <explain text for every report table)
These entries would define the same explanation text (perhaps a file pathname) for every table in a command report. The name of the Ada Analyzer command should be the name as it appears in the command menus, with spaces between words, no underbars.
If the Use_File_Based_Explain_Text switch is enabled, but a command name definition does not appear in this file, then the predefined explanations will be used. The defined explain text can be a single line of text or the pathname of a file. Pathnames may contain environment variables.
If the explanation text is prefaced by "HELP: ", then the remaining text is used to find an HTML file containing an explanation. HTML files are stored in the doc/html/all directory of the Ada Analyzer release. New HTML files can be added to the doc/html/all/explanation_help subdirectory. HTML files are located by the help system through mappings defined in the Doc.html.links in that same directory. A mapping can be placed in this file from a link name to an HTML file name. Format:
my_link_name explanation_help/my_html_file_name.html
The link name should then be used for the explanation text as in:
Some commands generate one table for each problem located and are therefore not suitable for this mechanism. Those commands are:
- Display_Set_Use_Problems
- Display_Subprogram_Execution_Problems
- Display_Set_Twice_Before_Use
Other commands generate one table for each item, unit, subsystem or Ada construct under analysis and are therefore not suitable for this mechanism. Those commands are:
- Display_Inter_Subsystem_References
- Display_Stack_Analysis
- Display_Subprogram_Branch_Points
- Display_Unit_Construct_Counts
- Display_Unit_Declarations
- Compare_Unit_Construct_Counts
- Locate_Similar_Record_Structures
Some command derive their descriptions from the reports they analyze and are therefore not suitable for this mechanism. Those commands are:
- Merge_Reports
- Compare_Reports
- Compare_Metrics
- Collect_Statistics
- Separate_Reports_By_Subsystem
- Generate_Listing
- Check_Reports_Up_To_Date
Commands for collecting metrics and analyzing coding violations specialized mechanisms as described above:
- Collect_Metrics
- Locate_Coding_Violations
- Locate_Coding_Violations_Interactively
- Locate_Specific_Coding_Violations
- Locate_Compatibility_Problems
- excluded_units file
Commands referencing this file: All commands
This file contains a list of units that should be excluded from analysis by all Ada Analyzer commands. Fully qualified pathnames to units, directories, and views can be listed in this file. This allows for selection of large numbers of units with the command dialog box, with specific exclusion defined by this file. A entry in the command log will be made whenever an excluded unit is encountered.
- type_sizing_file file
Commands referencing this file: Locate_Compatibility_Problems, Locate_Default_Initialization, Locate_Expressions, Locate_Objects_By_Size, Locate_Rep_Spec_Inconsistencies
This file defines parameter values used to compute the size of all noncomposite types. The value for each size represents the number of bits required on the target machine for each defined type given its precision and/or bounds. Composite type sizes are computed by summing the size of their component types.
The following values are the default values for each sizing metric. They represent possible values for a 32-bit machine. Zero values indicate that the particular type is not defined for this machine.
The Accept_Standard_Numeric_Sizes option has the following effect. An attempt is made to compute the size of all types from their constraints. But if this fails and if this option is set to true, type declarations whose ground type appears in Standard and whose name is one of short_short_integer, short_integer, integer, long_integer, short_float, float, or long_float will be assigned the size specified by the short_short_integer_size, short_integer_size, integer_size, long_integer_size, short_float_size, float_size, or long_float_size options respectively from this same file. This offers an alternative mechanism for computing the size of types whose bounds are larger than those supported by the host machine.
The following configuration parameters deal with the packing of Booleans, enumeration types, and integer types. They can be used to perform comparison analysis, if these types were packed into some minimal size. See the description of the command "Locate_Objects_By_Size" on page 179 for more information.
- type_sizing_name_map file
Commands referencing this file: Locate_Compatibility_Problems, Locate_Default_Initialization, Locate_Expressions, Locate_Objects_By_Size, Locate_Rep_Spec_Inconsistencies
This file contains names of type declarations (fully qualified from the library-unit level) and the number of bits required for that type. This file can be used when the exact size that the compiler generates for a type is known and when the size approximated by the target size computation is not accurate enough. The expected format is TYPE_NAME => ## (size in bits), one mapping to a line. Comments and blank lines in this file are ignored.
| Rational Software Corporation
http://www.rational.com support@rational.com techpubs@rational.com Copyright © 1993-2000, Rational Software Corporation. All rights reserved. |